Category: Tutorial

  • HOW TO: Set Parental Controls on Macbook and iMac (OSX)

    HOW TO: Set Parental Controls on Macbook and iMac (OSX)

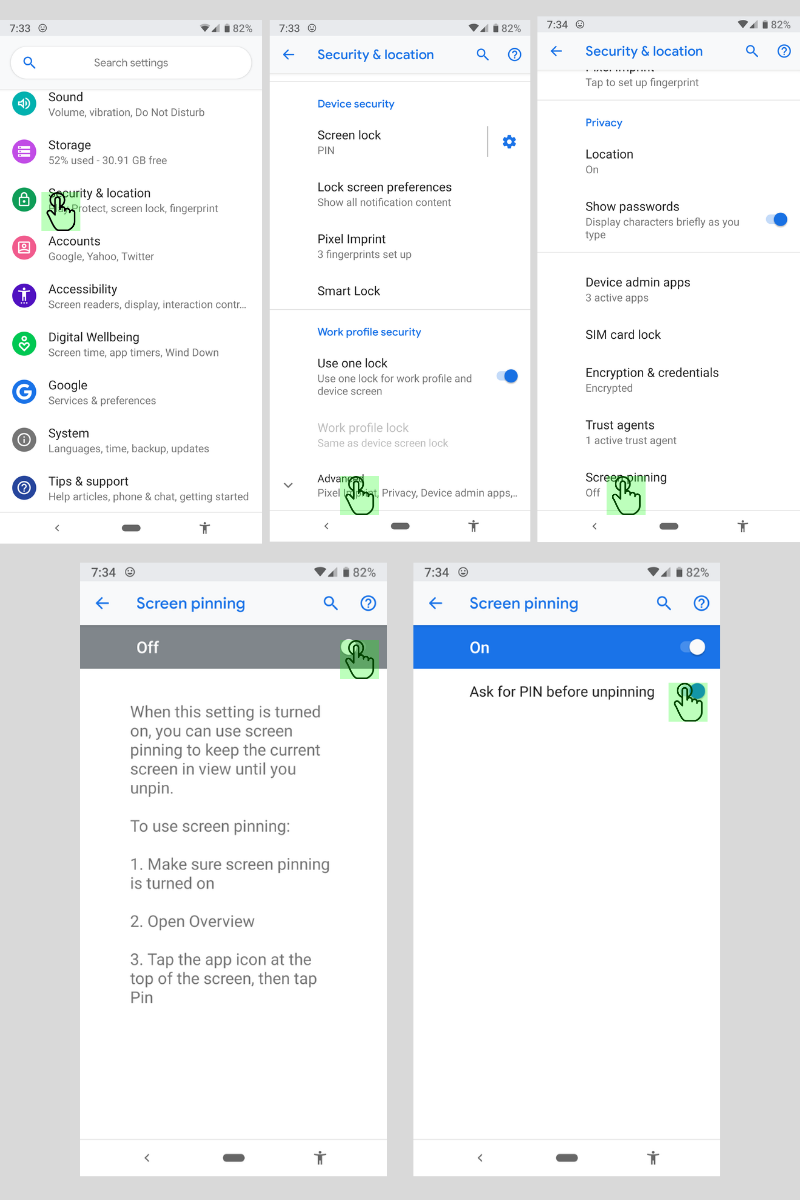
    The tutorial video above will walk you through the steps necessary to set up parental controls on your Macbook Pro, Macbook Air, or iMac. These settings work with OSX High Sierra or OSX Mojave. Below is a brief summary of the steps necessary to set up these parental controls.

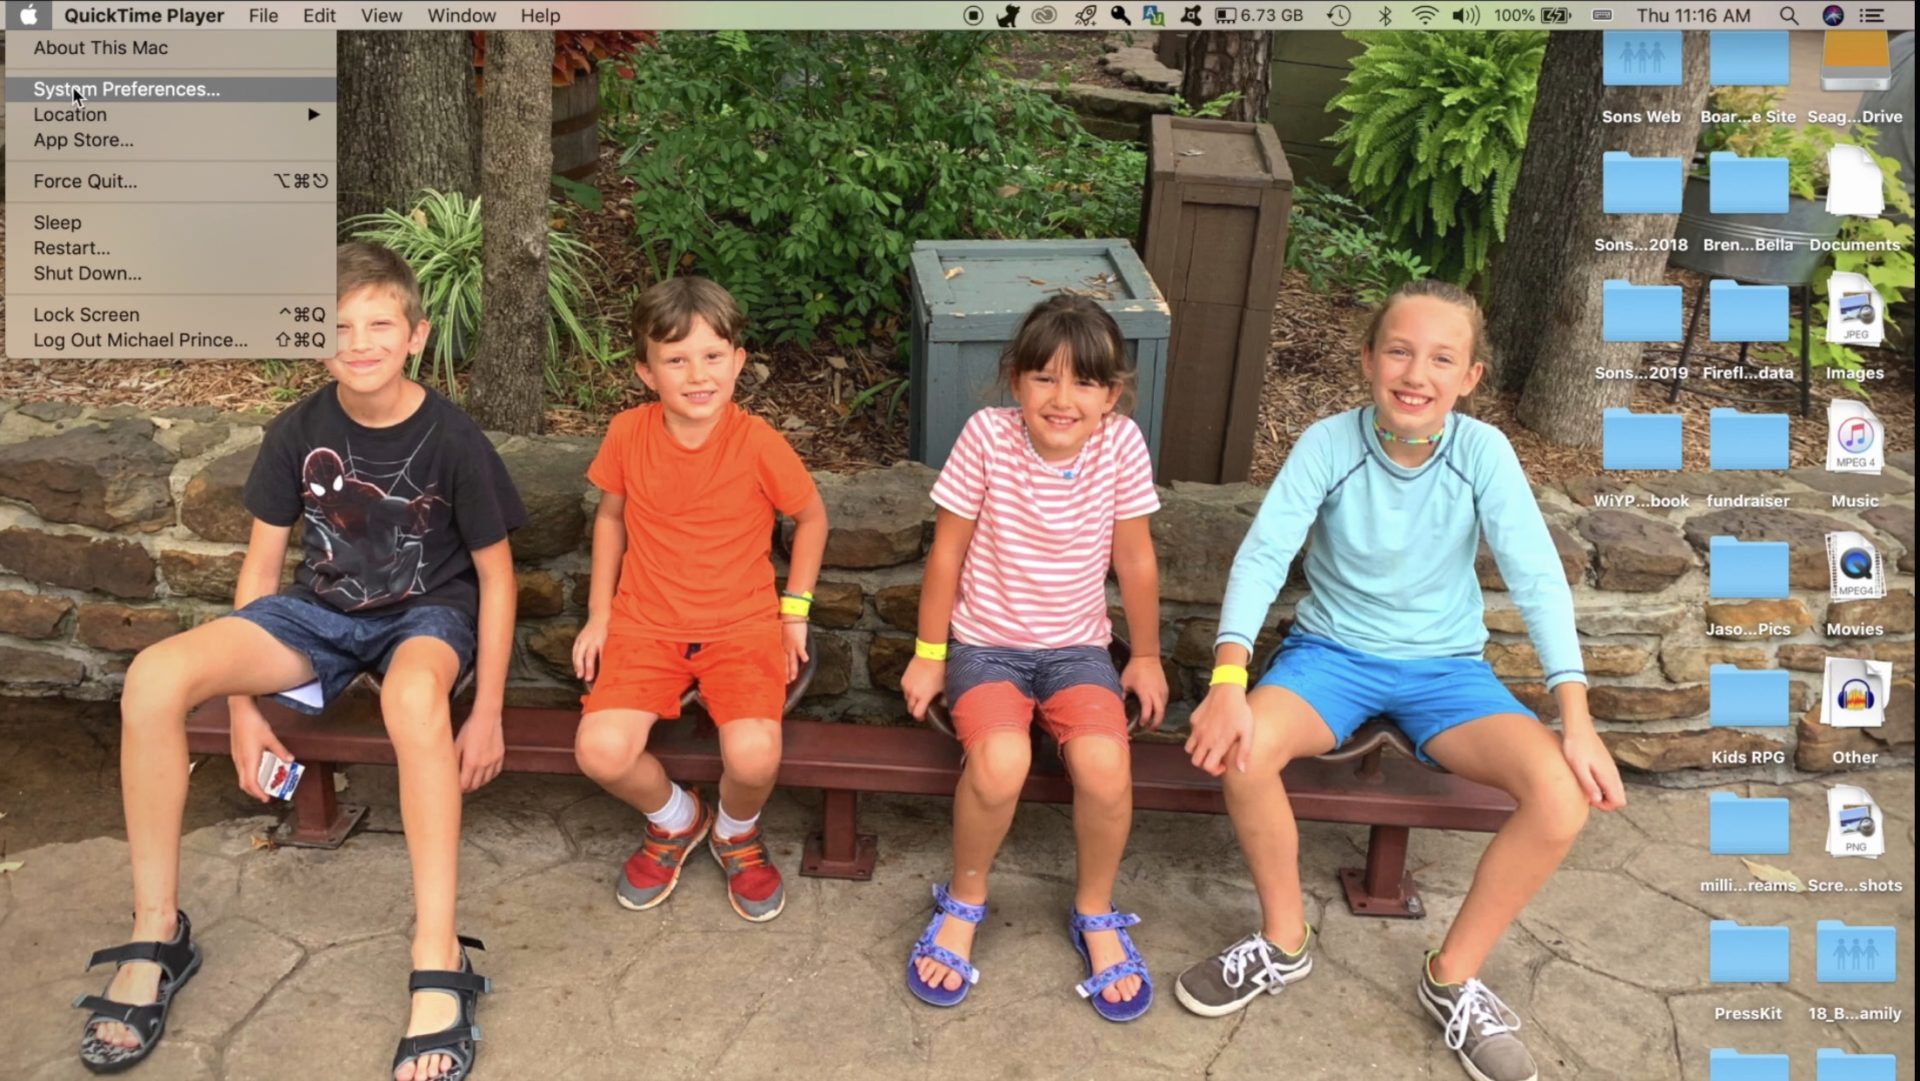
    Open Preferences by clicking the apple logo in the upper left corner of your Macbook desktop and then clicking Preferences.


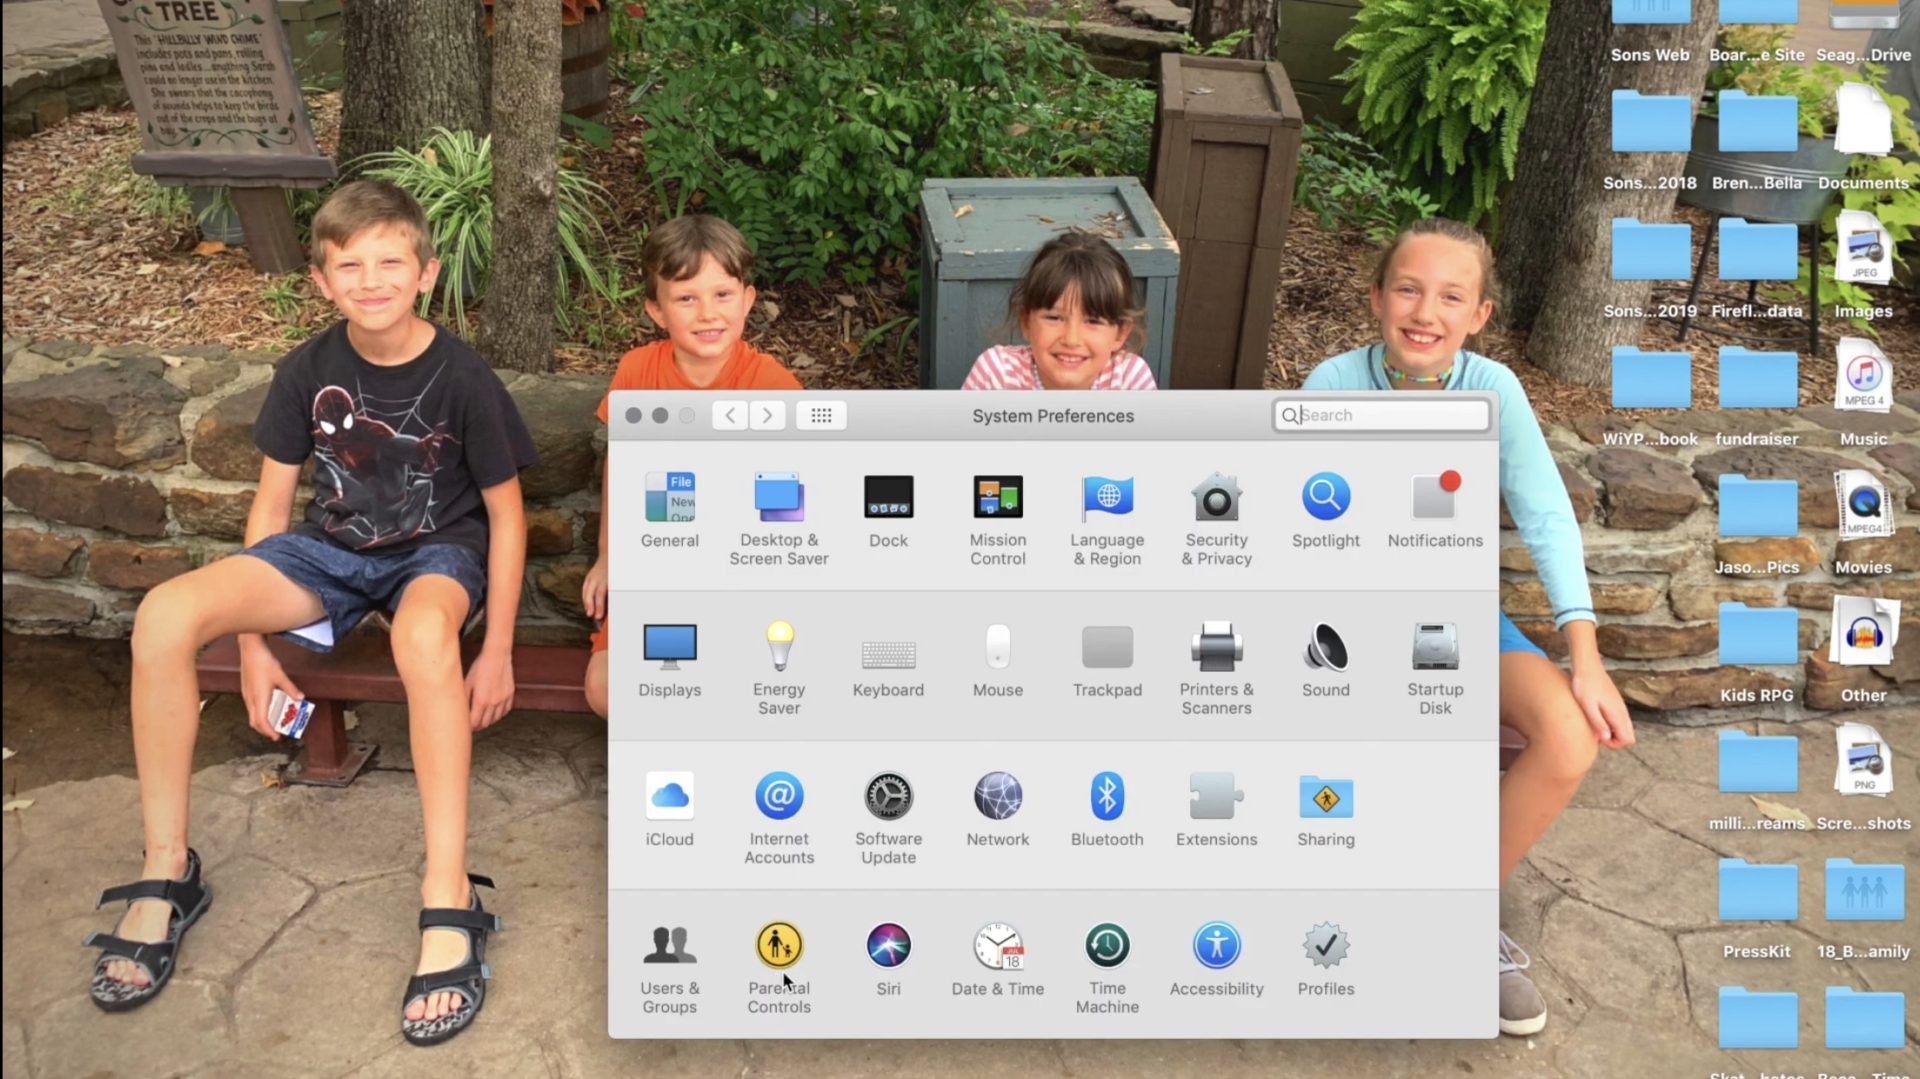
    Click on Parental Controls on the bottom row of icons in the Preferences menu.


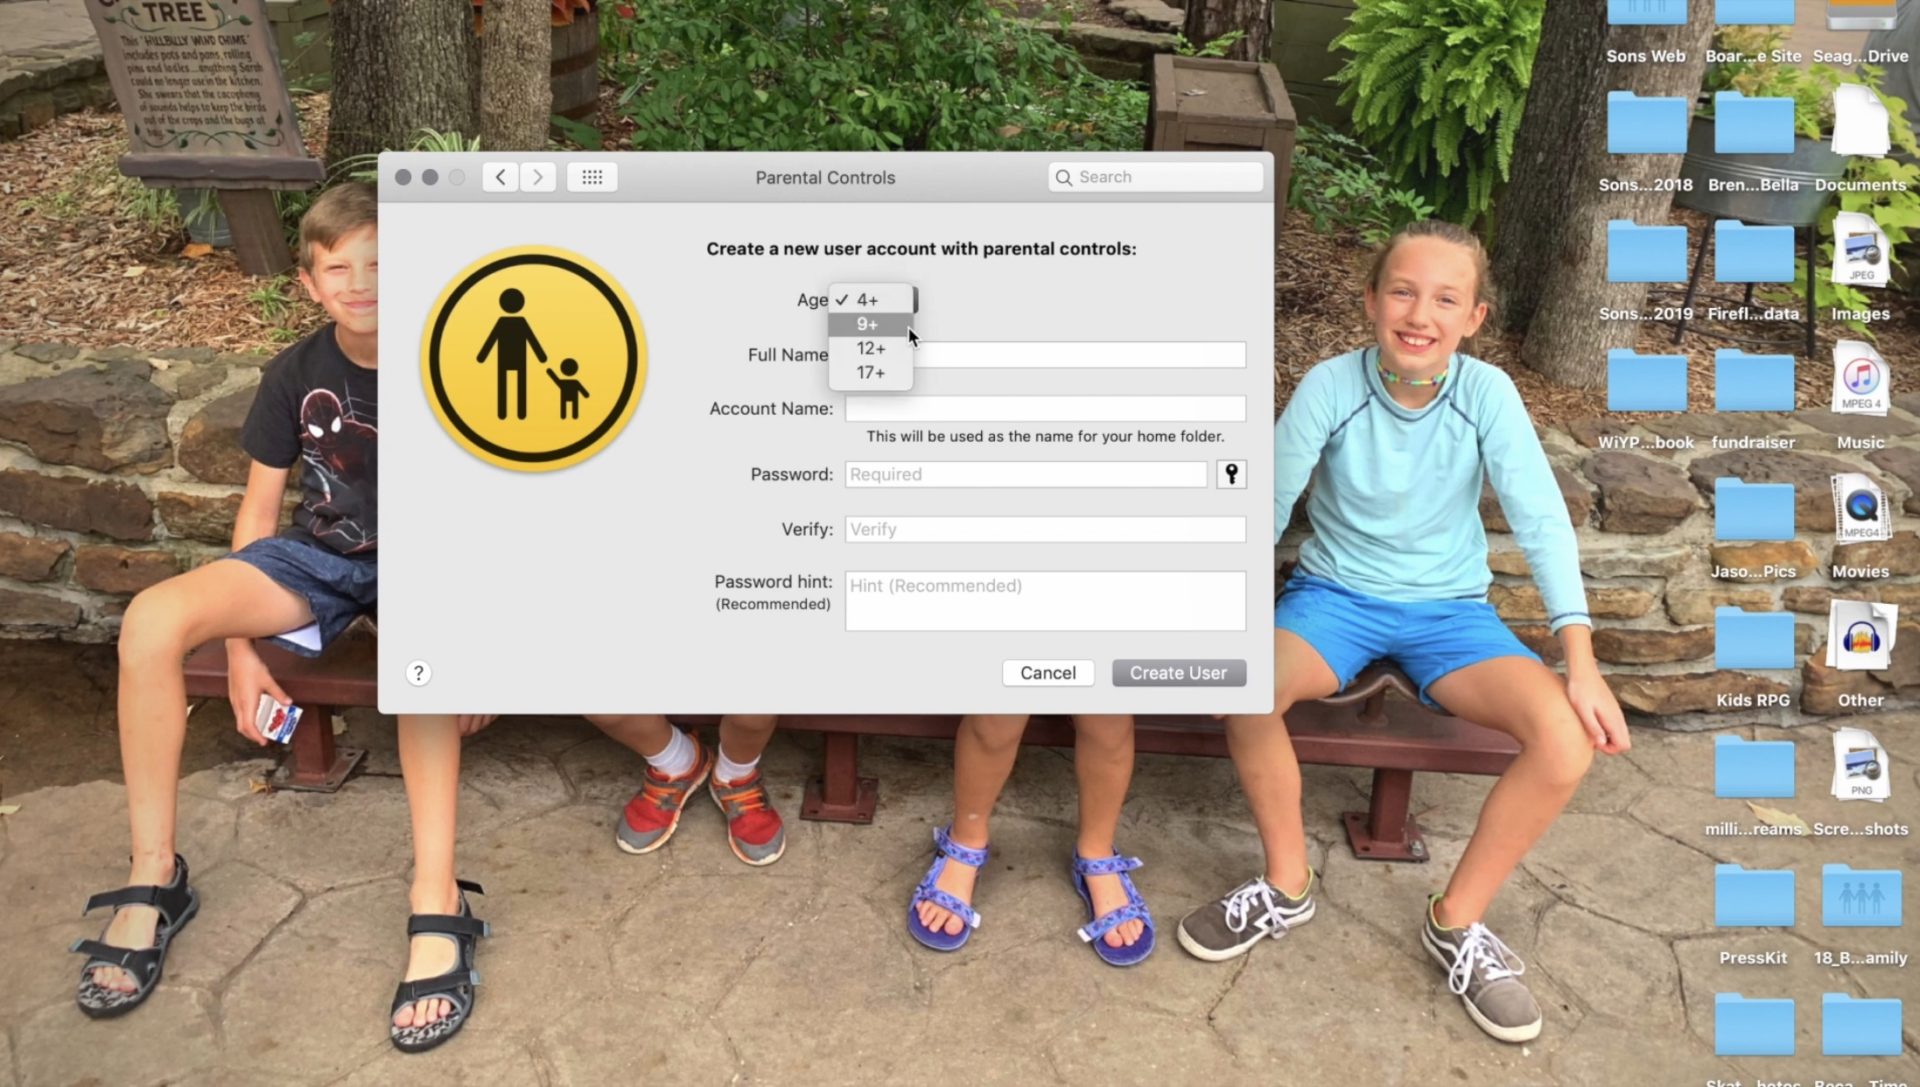
    Follow the steps for creating a new account with the information of the person you are trying to set filters and restrictions for.


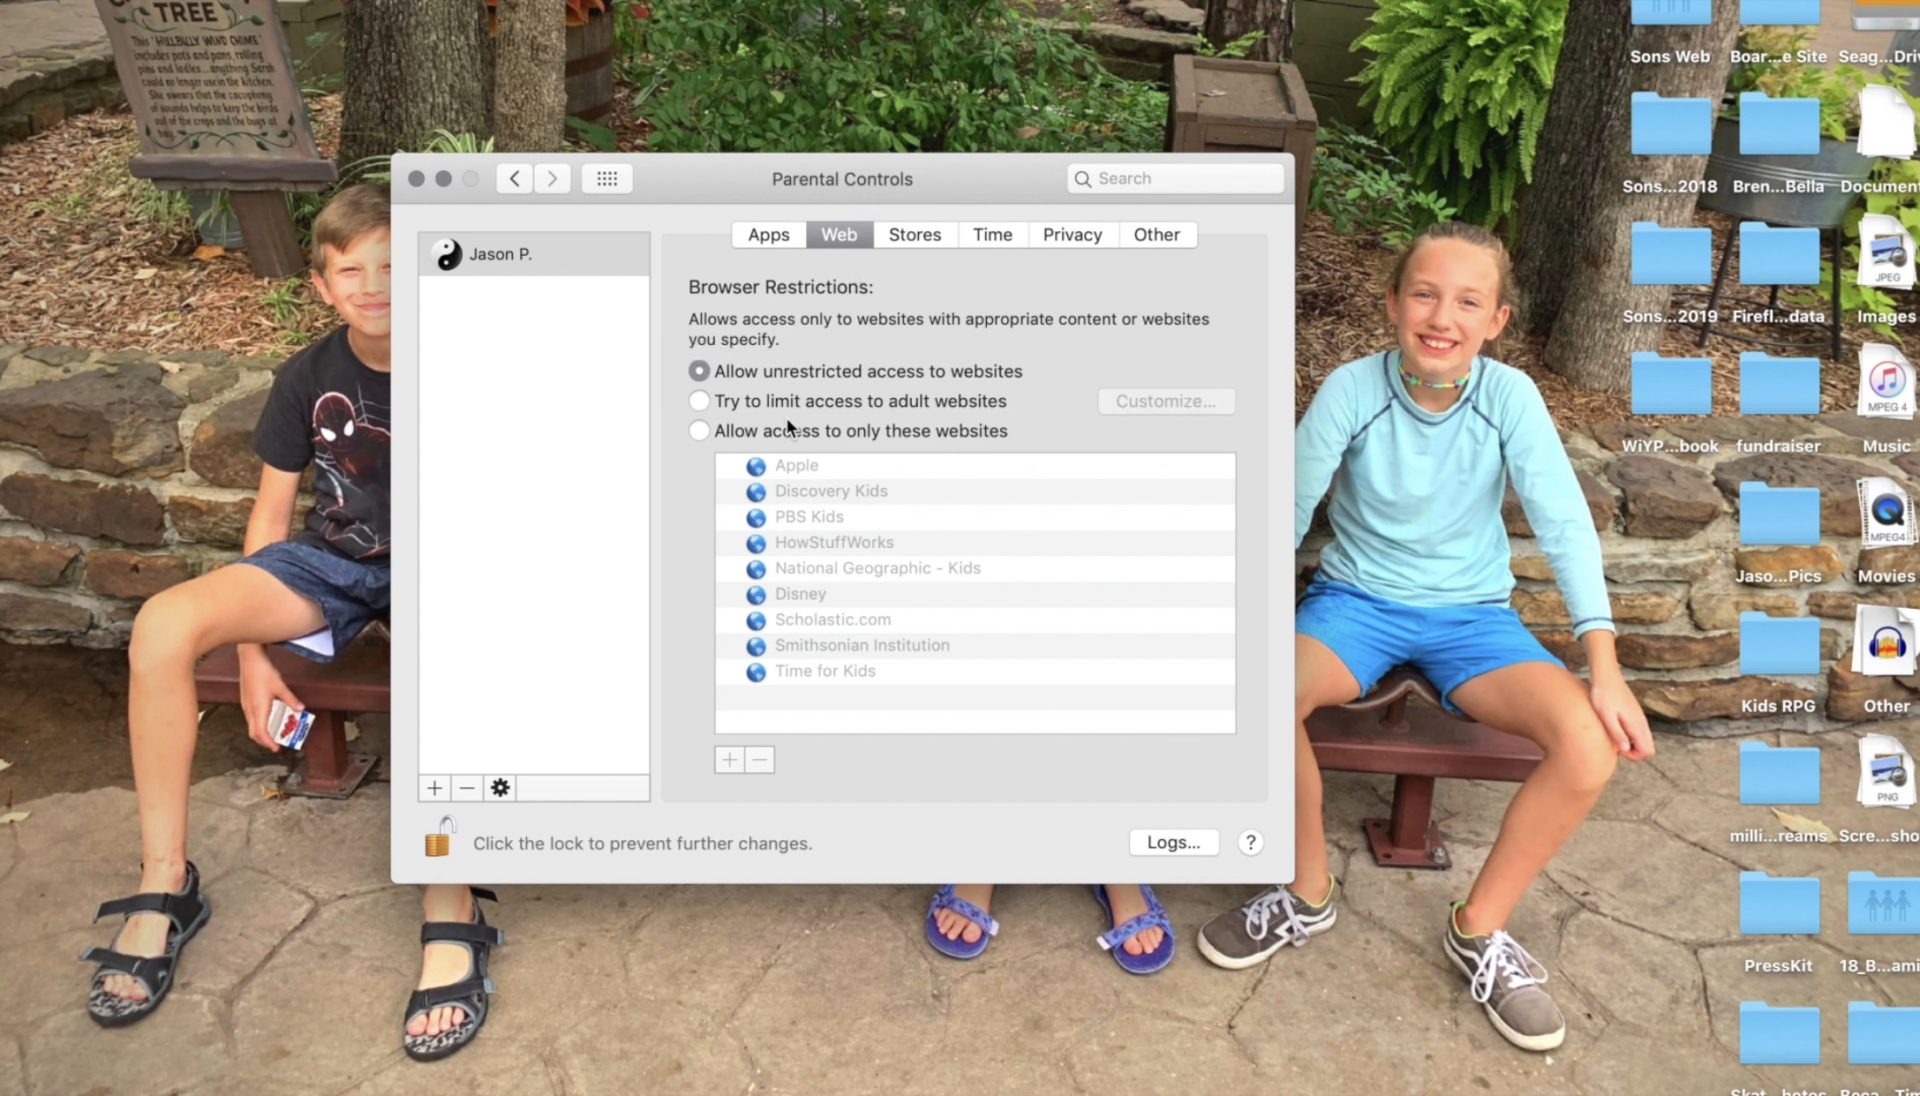
    Set Restrictions for apps and web content.


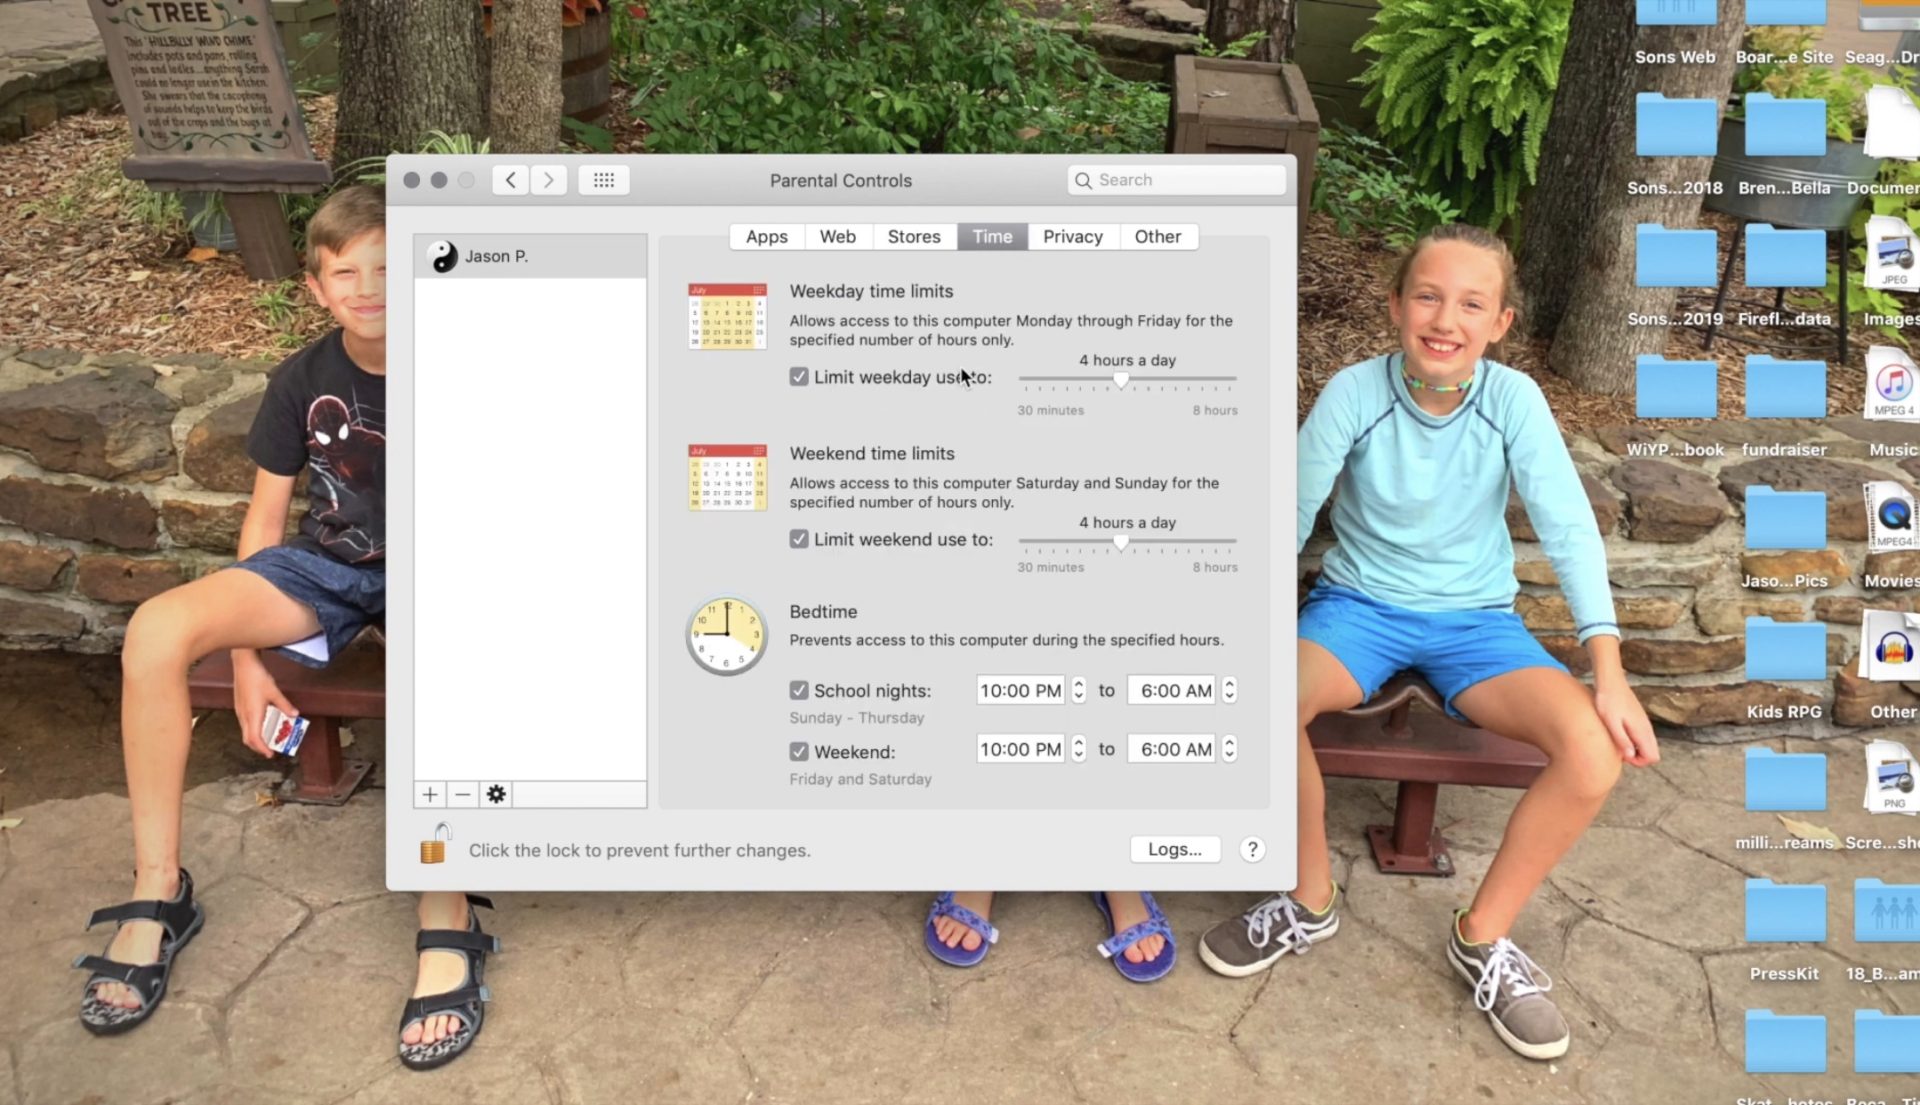
    Set desired time restrictions and bedtime hours.


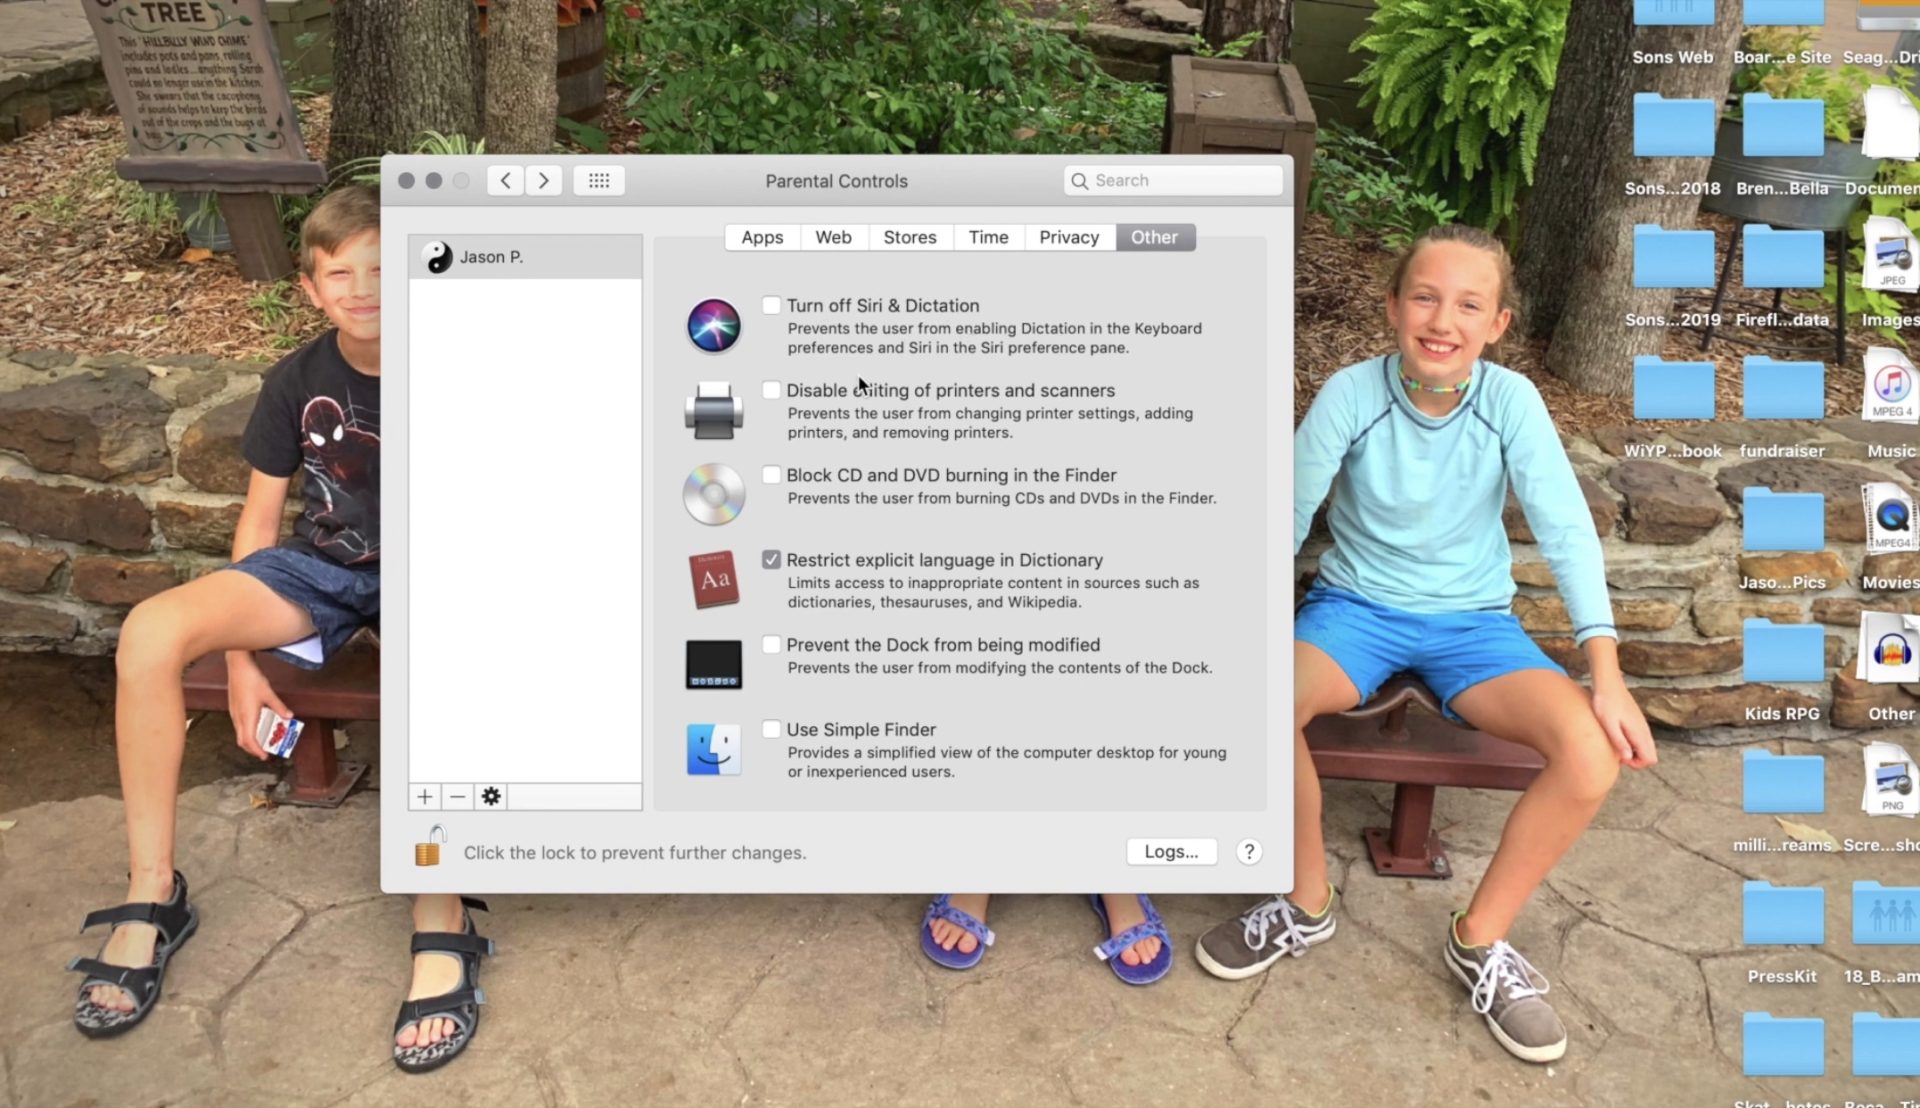
    Adjust settings for other content such as Siri and the OSX dictionary.


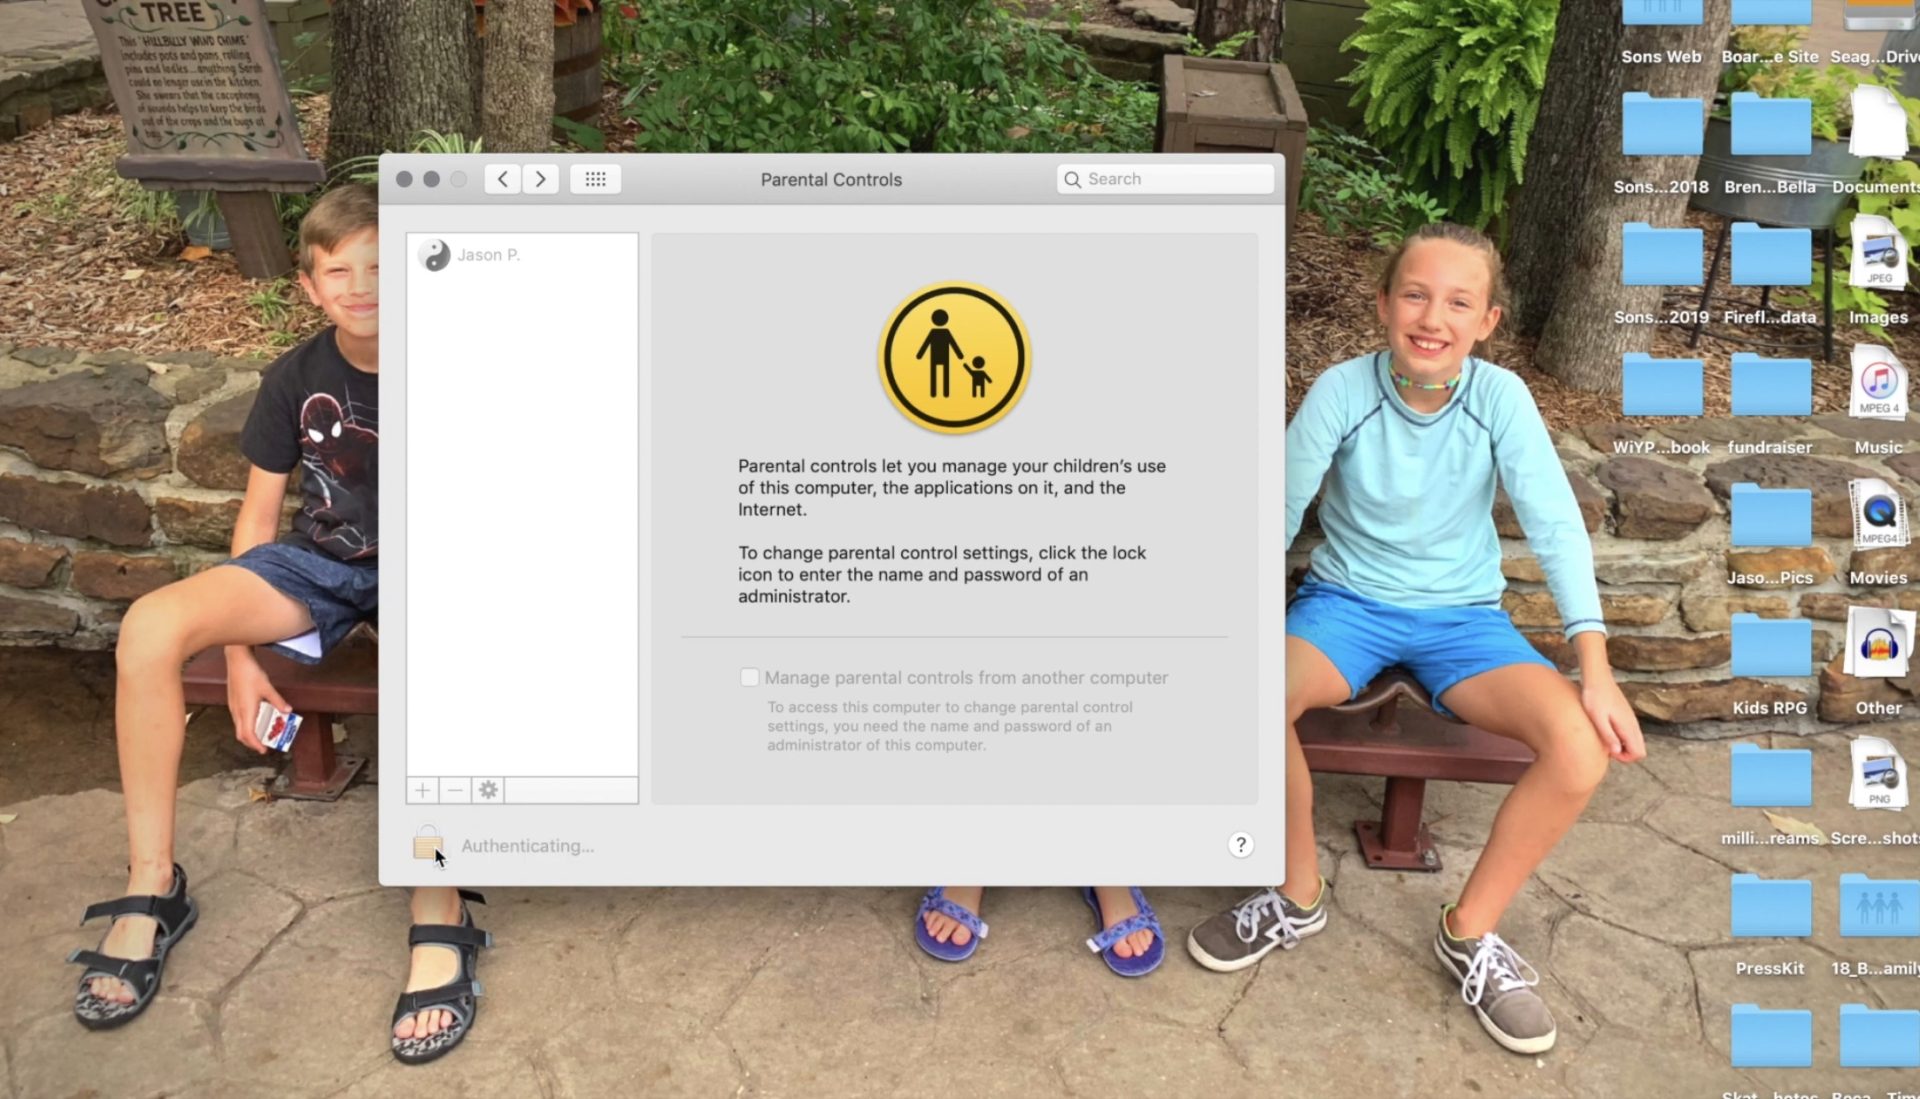
    Clicking the lock with set the changes and password protect the settings you adjusted.

    Setting these restrictions will help you have peace of mind while your child or teen uses their OSX device. If you would like further confidence that they are only seeing things that they should be seeing, look into an accountability software like Accountable2You. Also, if you come across any problems or have any questions please comment below or send us a message on Facebook.


  • TUTORIAL: How to Keep Your Kids in a Single App on Your Android Device

    TUTORIAL: How to Keep Your Kids in a Single App on Your Android Device

    If you’ve ever given your smartphone to your kids to play a game you know that you always run the risk of them opening another app or getting access to something through an Internet browser that might be objectionable.

    Parents using iOS are able to use Guided Access to limit their kids to one app for a certain amount of time but what can parents with Android phones do?

    Screen Pinning is the solution. It’s been available since Lollipop (5.0) and is advertised as a security feature but it’s a good parental control too.

    Screen Pinning only allows one app to run and someone with your phone cannot switch to another app without you PIN or fingerprint.

    There aren’t any time limits built into Screen Pinning so we’ll cover that in another article about “Digital Wellbeing”. For now, here’s how to enable this helpful feature.

    Many smartphone manufacturers implement Android a little differently. If you’re having trouble with these instructions, check with your carrier or phone manufacturer.

    These instructions are for Android 9.0 and up. If you have an older version of Android the instructions are a little bit different. You can find instructions for older versions at Google’s Help Center.

    How to Enable Screen Pinning

    1. Open your device’s settings.
    2. Tap Security & Location > Advanced > Screen Pinning.
    3. Turn on screen pinning (remember to require your PIN to disable).

    How to Pin an App to the Screen

    1. Open the app you want to pin.
    2. Swipe up to the middle of your screen.
    3. Tap the app icon.
    4. Tap the pin.

    The app is now pinned and cannot be switched without your PIN or fingerprint.

    How to Unpin an App From the Screen

    1. Touch and hold the back and home icons.
    2. After your device locks, enter your PIN or use your fingerprint to unlock.

    The app has now been unpinned and you can use other apps.

    That’s all there is to it. The next time you’re waiting in line at the DMV and your kid asks to play a game, you can give him your device without worrying that he’ll watch red band trailers on YouTube.

  • iOS 12’s Screen Time App Changes Everything!| Video

    iOS 12’s Screen Time App Changes Everything!| Video

    Apple’s latest operating system is out and features something parents have needed to see for a while. Screen Time is a way to monitor the amount of time spent on your device and set limits for yourself as well. You can set limits for certain apps, schedule time off, and even check to see how often you get notifications and from what apps.

    Scheduling “Downtime” is as simple as an on and off switch but is customizable as well with the ability to set apps to “always allow” change privacy and restrictions. Yes, restrictions have been moved from their own category in the General settings to a sub category within Screen Time. Don’t worry, though. All of your screen time settings can be password protected. App usage and data can be seen without a password but settings can’t be changed unless you enter your four digit code.

    There is much more about how Screen Time works in the video above.

    What Parents Should Know

    This is one of the biggest steps toward the total parental control package built in to a phone. If the filter was a bit stronger (it can be improved through usage) it would almost have it all. I still recommend an accountability software and something to monitor messaging.

    This addition by Apple is a step towards taking responsibility for the risks and addictive nature of their products. Speaking, myself, as one who feels like I’m missing a body part when I don’t have my phone, it is really good to have a reminder of how much time we actually spend looking at our screens. Set up screen time for your kids and teach them how to be mindful of the time they spend on their devices. Set it up for yourself too and hold yourself responsible for the amount of time you spend on your devices. Lead by example and put the phone down every now and then.

  • TUTORIAL: How To Use Accountability Software

    TUTORIAL: How To Use Accountability Software

    One of the easiest ways to protect your kids online is to monitor their internet activity. Accountability software is the most effective way to do that. Accountability software does not block anything, it will report when something inappropriate has been viewed so you can talk to your child or significant other about what they spend their time doing online. 

    Our favorite Accountability Software is Accountable2You. I love it for a lot of reasons, probably the biggest reason is their support base. I have had a great experience when I have had to contact their support team to help me figure out setting up new devices. Some of the best features of Accountable2You are their GPS tracking (included,) their iOS VPN settings, and their time management tracking. 

    The video above will walk you through how to sign up and use Accountable2You. We are an affiliate of this software and you’ll get 30 days free if you use our promo code: BECAUSEFAMILY. 

  • How to Turn Off Hidden Location Access in iOS

    How to Turn Off Hidden Location Access in iOS

    I recently noticed that some of my photos and videos were still being tagged with a location. One of the most common pieces of advice I give to parents is to turn location access off to their cameras. I was a bit annoyed because I never saw location information in my Photos app before, but now I was. Well, I did a bit of digging and found the culprit. It’s about five taps deep into your privacy settings and, therefore, easy to miss. Below is a short video tutorial to help you be sure location info on your phone stays as private as possible.

    Why Turn This Off

    Your location information is easy to track and very easy to gather from the data in the videos and pictures that you upload to social media. There have been instances of kids being harassed by predators who learned where they were through images their parents had shared online. Common sense tells us never to post pictures or videos that show an address number, school name, or sign of a place you frequently go with your family. The problem is that some of the apps on our phones tag our locations by default. I recommend you look at every app’s location request and ask yourself, “Does this app HAVE TO know where I am to function properly?” If it does not, then turn off access to your location.

    Hopefully, this short video helps you make the changes you need to feel like your privacy is even more secure. I know I feel better.

  • TUTORIAL: How to Download All of Your Photos, Videos, and Messages from Facebook at Once

    TUTORIAL: How to Download All of Your Photos, Videos, and Messages from Facebook at Once

    There could be a number of reasons you’d want to download all of your Facebook data. Maybe you’re making a fresh start but don’t want to lose photos and videos, maybe something’s going on and you need message data downloaded, or maybe you just want to back up all your data for when the giant electromagnetic pulse goes off someday and the internet comes crashing down. Whatever reason you’re interested, here are the simple steps you can take to download all of your Facebook info at once. The tutorial video is at the bottom of this post.


    1. Go to your settings page.


    2. Click on Download a copy Facebook Data


    3. Click download archive.


    4. Enter your password and click Submit


    5. Your data downloads as a zip file.


    6. Once unzipped, you’ll see your files separated into folders.


    7. Keep somewhere safe and share with caution as some of the data is personal.


    There are the instructions. Here’s a video tutorial:


  • The Best Way to Keep Your Kids Safe On Youtube

    The Best Way to Keep Your Kids Safe On Youtube

    Parents are always asking me for advice on keeping their kids safe on YouTube. Especially parents of older kids who may feel like YouTube Kids is a bit too young for their liking. I recommend building approved playlists. Find videos on YouTube that you are ok with them watching and put them in a playlist. This will allow them the freedom to watch videos without you pulling up each one while still keeping them safe from happening upon something inappropriate. You can also add playlists to your library that have been created by another channel. Then, you just have to discuss with your kids that they should only watch videos from the playlists you’ve put in the library. This keeps things safe. Watch the video below to learn how to build these playlists and hear more about why it’s a good idea.


    This is also a great idea for teachers and ministers who may want to show videos but don’t want something showing up unintentionally. If you’re playing videos from your playlist, you won’t accidentally show some video you haven’t pre-screened. YouTube can be an awesome tool but there is a lot of content on there that may not be classroom friendly. Use this tutorial to help you set up playlists and keep that stuff off your screen.

    UPDATE: Here’s a video tutorial to help you set up a playlist on the mobile app.

  • VIDEO: Three iOS 11 Features Parents Need to Know

    VIDEO: Three iOS 11 Features Parents Need to Know

    More than half of all iPhone users are now using iOS 11 and there are some major changes. The biggest change is the control center. This has become a lot more useful with the iOS 11 update and there are some features that parents should know so that they can use them to further protect their kids.

    Screen Recording

    Screen recording hasn’t been built into iPhone until this update. It’s a way to capture what’s happening on your screen and then save it as a video in your photos. This feature is cool and very useful for projects like making this video but there is a bit of a concern with kids sending messages and them being recorded without their knowledge. Keep your eye on this one.

    Quick Guided Access Button

    Guided access is an awesome way to keep you younger kids safe. The quick access button allows you to get to you GA settings quickly and use the feature to keep your kids safe. Do Not Disturb While Driving

    Do Not Disturb While Driving

    This is one that’s been needed for a while. The Do Not Disturb While Driving feature lets you just tap a simple button in your control center and not be distracted by texts until you turn it off. Pretty good idea, even if it has been a long time coming.

    There are more details and some screen capture of these features in use in the video below:


  • Facebook Stories is Going Public

    Facebook Stories is Going Public

    Instagram, WhatsApp, and Snapchat have proven that 24-hour disappearing story feeds are the latest social media trend. Facebook is trying to increase user-ship of their stories feature by allowing people to post publicly. After a recent Facebook update, you can now change the privacy settings on your story posts to make them visible to anyone on Facebook. 

    Facebook Stories is really the only version of the daily posts feature that has been lagging behind in user-ship. Celebrities and brands will now be able to use Facebook stories to promote publicly just as easily as they can on Instagram and Snapchat. This may be an attempt for Facebook to increase the number of people using their stories feature but it’s likely, also, a way to entice more advertisers into using the feature.

    What Parents Should Know

    Any option to share something publicly should be known to parents. If your kids use Facebook and enjoy posting their daily activities on their Story feed you should know how to check and see if they’re posting publicly. Below is a slideshow of how to check the privacy settings on Facebook Stories.

    Be sure to check out what your kids have been sharing publicly and talk to them about the permanence of anything shared online. It’s also a good idea to talk to them about what to do if they receive contact from people they don’t know on any social media platform. As parents, we are the ones responsible for our kids’ safety and privacy online. Learn the ways these social media services have provided for you to keep them safe and private.